
Removing the head on 2009 6.7 cummins with egr/egr cooler delete. I was out digging when the gasket blew so the motor is really dirty dont mind that LOL.
1.Disconnect both batteries. Its a 1/2" nut, I just use a ratcheting end wrench, and I take off both neg and pos terminals.
![Image]()
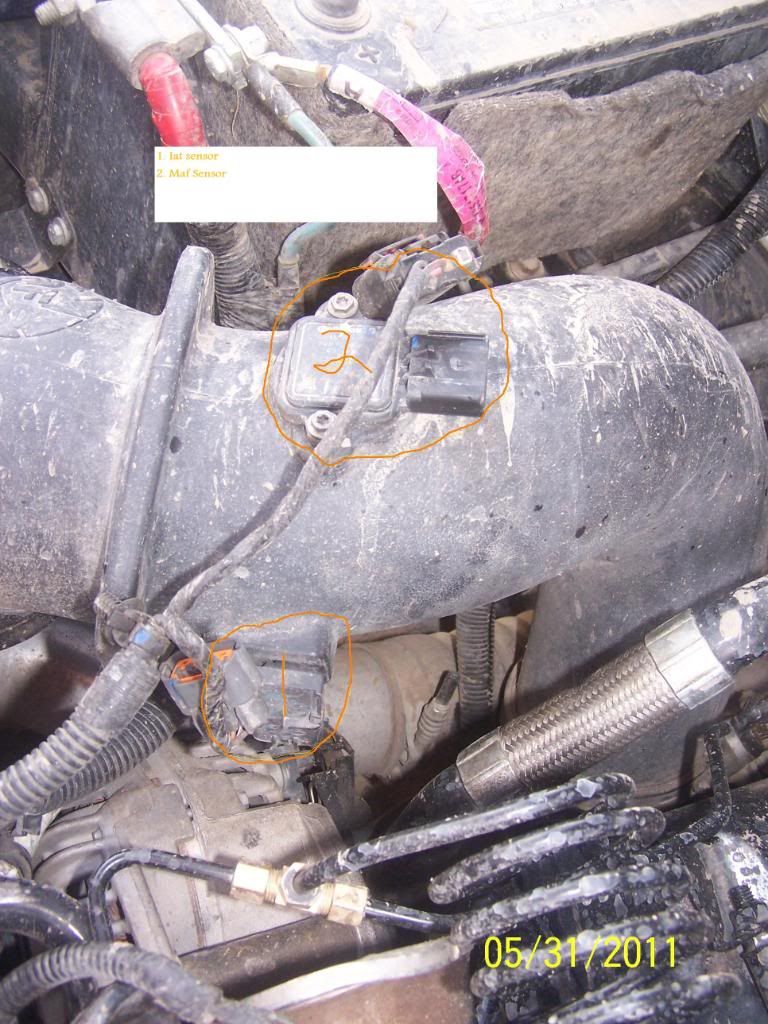
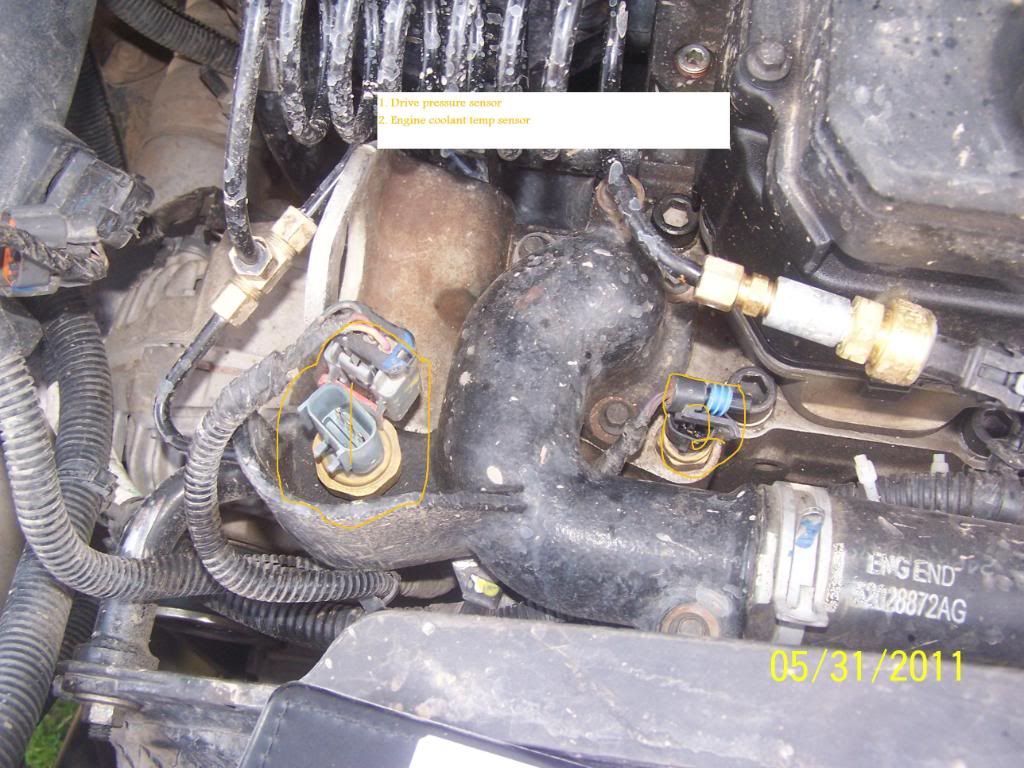
2. Unhook all sensors. Pictures show all sensors but Map sensor which is on the back side of the inake horn. If running stock intake horn there will be a couple more sensors on the horn that need unhooked.
![Image]()
![Image]()
![Image]()
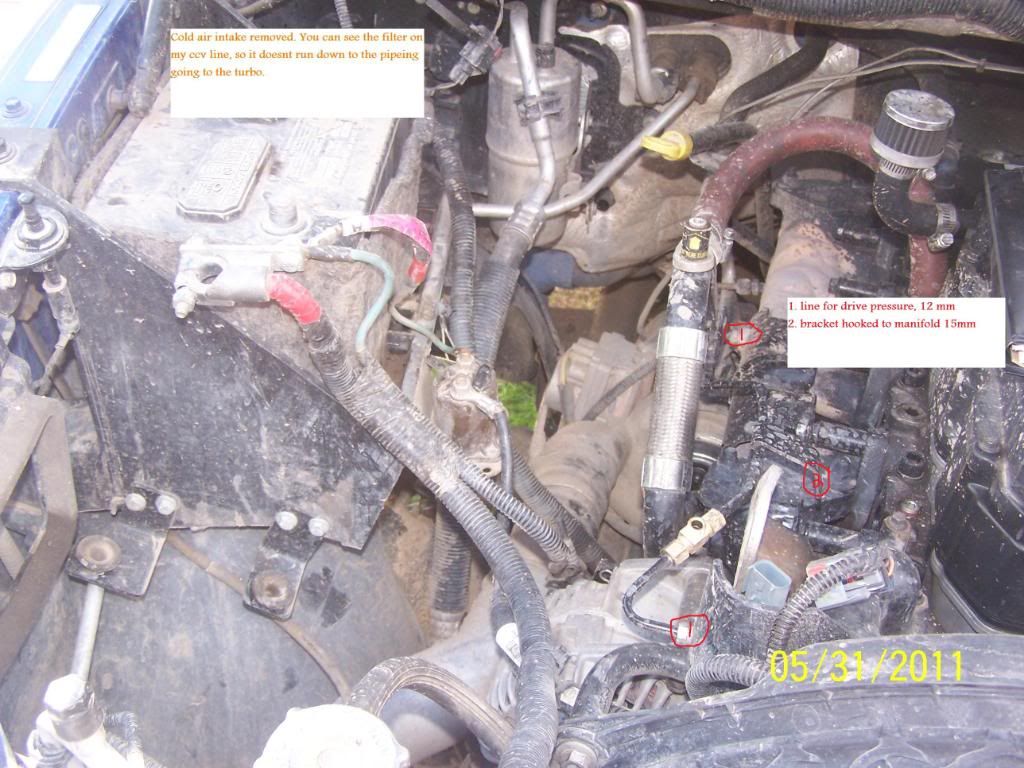
3. Unhook both ccv drain lines. Just wiggle them back and forth and pull them off. Might have to use a flat head screwdriver to pry them away also. Once the lines are removed, pull out the fittings using a 3/4"
![Image]()
4.Remove cold air intake, or stock airbox from truck. I have a afe, and dont run the box on it, so I just used a flat head screwdriver and loosened up the clamp right on the turbo, and pulled the whole tube and filter our as one piece. I also have my ccv line bypassed and plugged , so if you have a stock airbox you will need to unhook that line also.
![Image]()
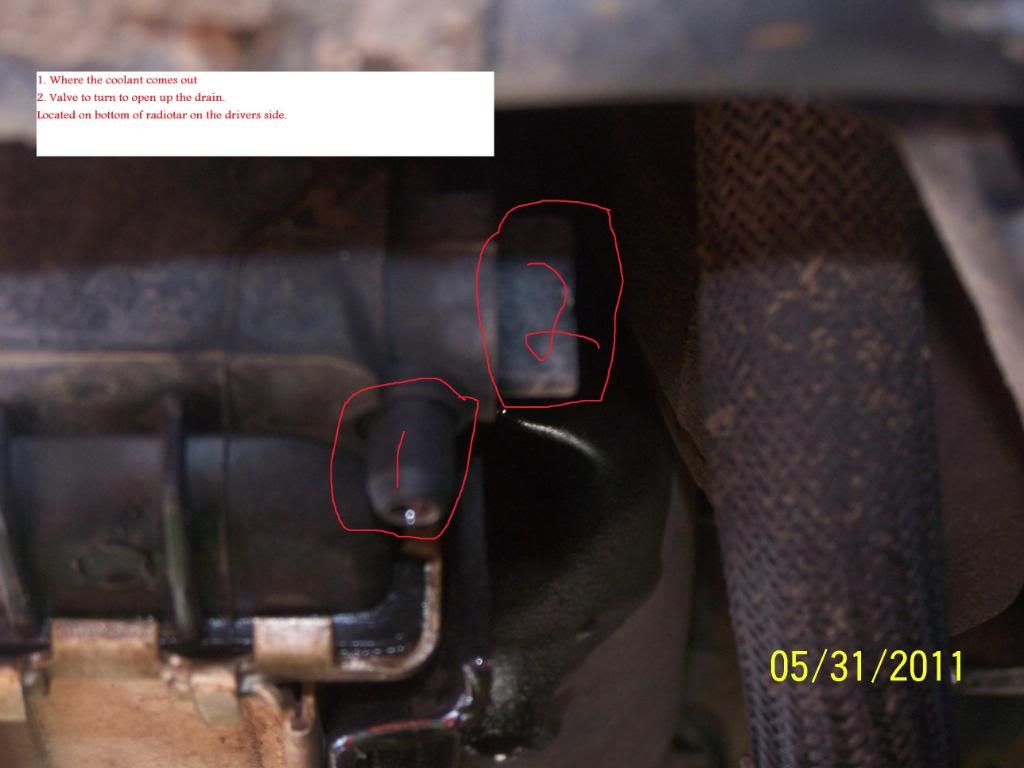
5.Drain coolant out from the bottom of the radiator, use a pair of pliers if it wont turn by hand. It turns 90* then pops out. Put a clean bucket underneath it so you can reuse the antifreeze. It drains pretty slow, and you dont need to drain all of it out just like 2 gallons, you can leave it draining and move onto the next steps, then close it up later.
![Image]()
6.Remove dipstick bracket. I am running h&s horn, so I use 7/16" wrench and unbolt it from the bracket that is hooked to the ccv cover. If running stock intake it will be 1 10mm bolt holding it on.
![Image]()
7. Remove 5 intake manifold bolts, or 6 if running stock intake. They are 10mm and I use socket and rachet with extension. Loosen clamp up on intake horn to intercooler piping. I used a 7/16" ratcheting end wrench, or you can use a deepwell socket. Remove the intake horn, being careful to not ruin the gasket unless you have a new one. I also put papertowels in the tubing so nothing can be dropped into it.
![Image]()
![Image]()
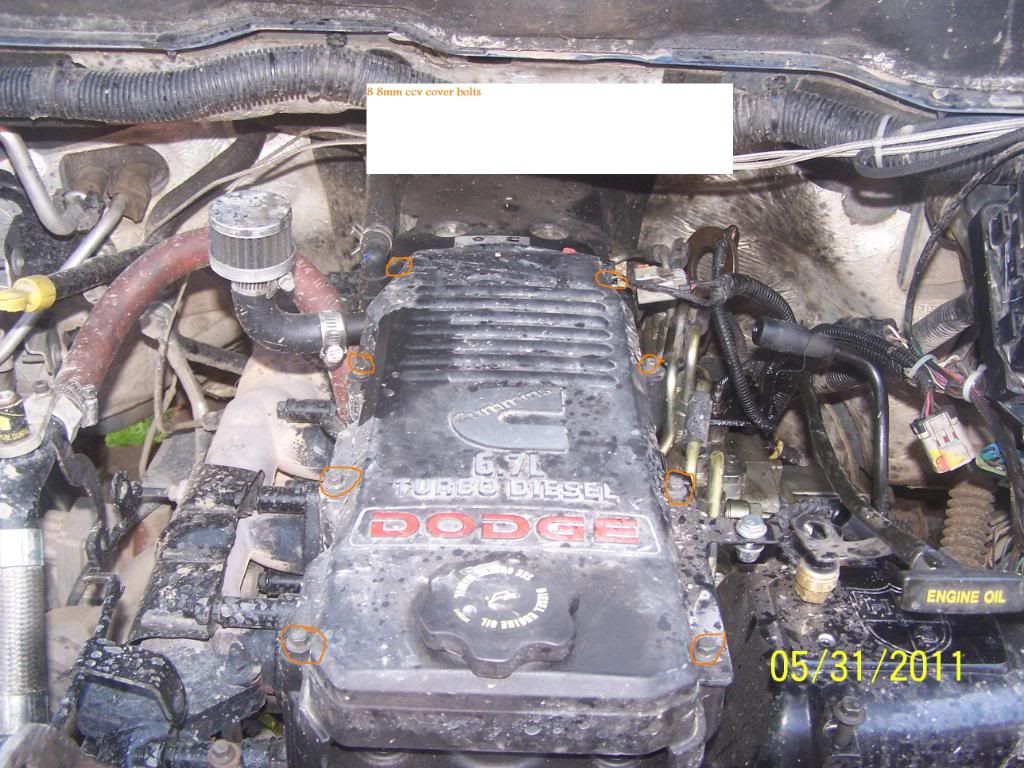
8.Remove the 8 8mm bolts holding the ccv cover on. Remove oil cap. Pull off cover and remove ccv filter. Inspect filter to see if it needs replaced.
![Image]()
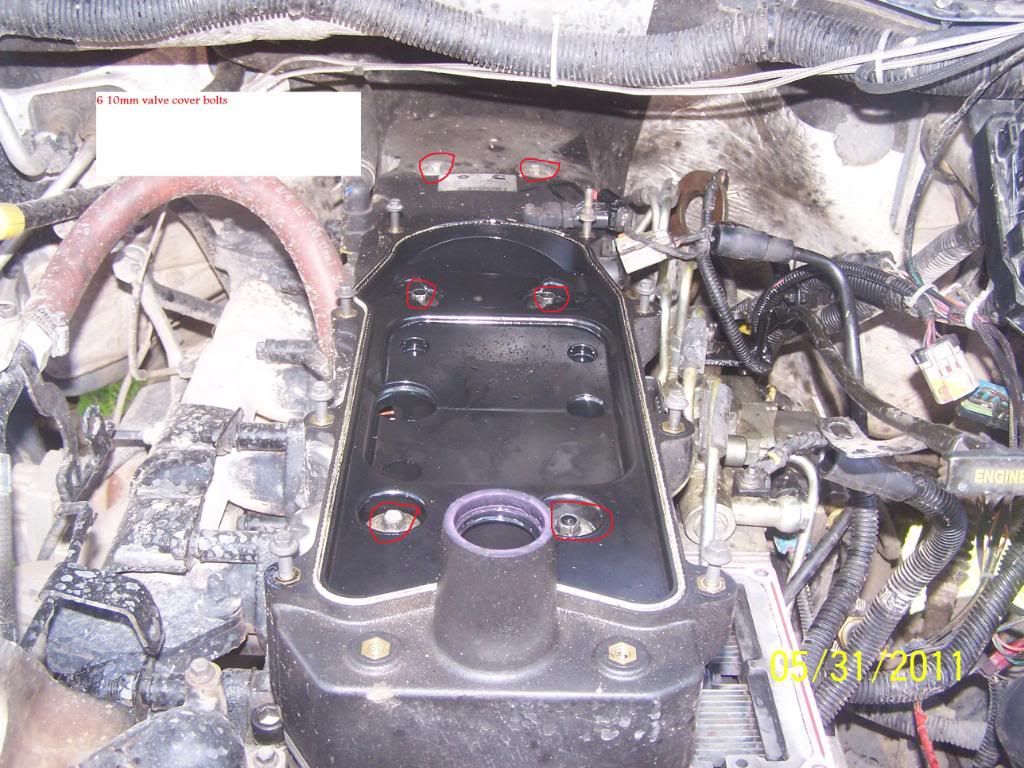
9. Loosen the 6 10mm vlave cover bolts, and pull valve cover off.
![Image]()
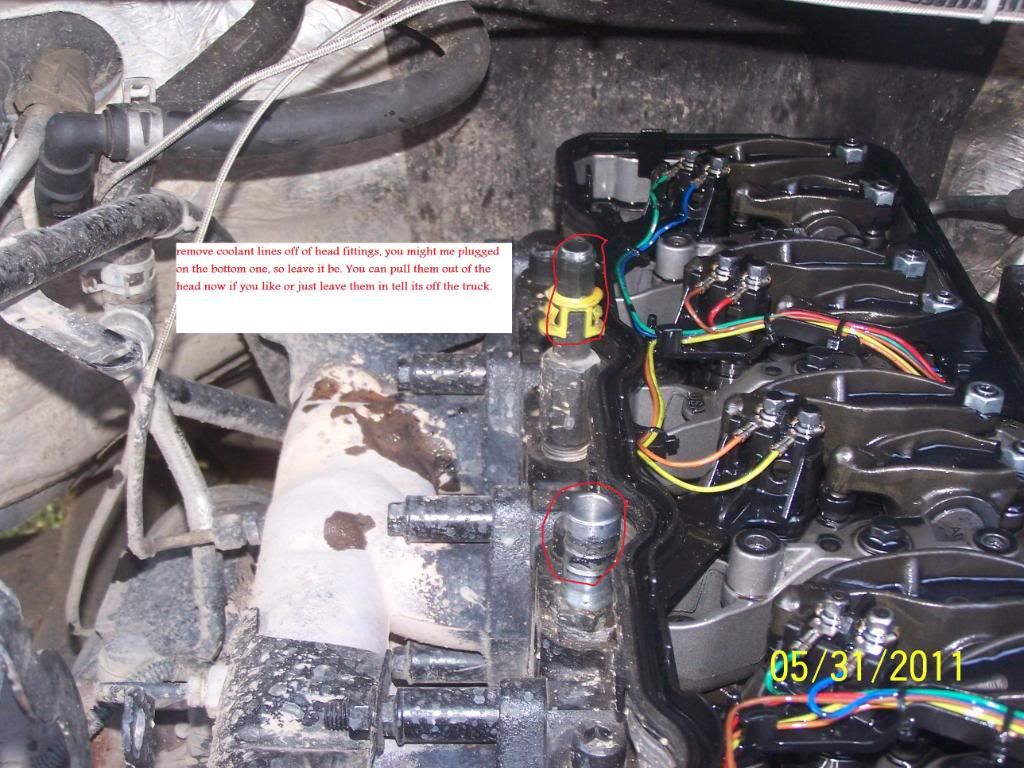
10.Remove the coolant lines off the head fittings, if you are plugged then you dont have to remove the one. You can screw them out of the head now, or leave then in tell the head is pulled.
![Image]()
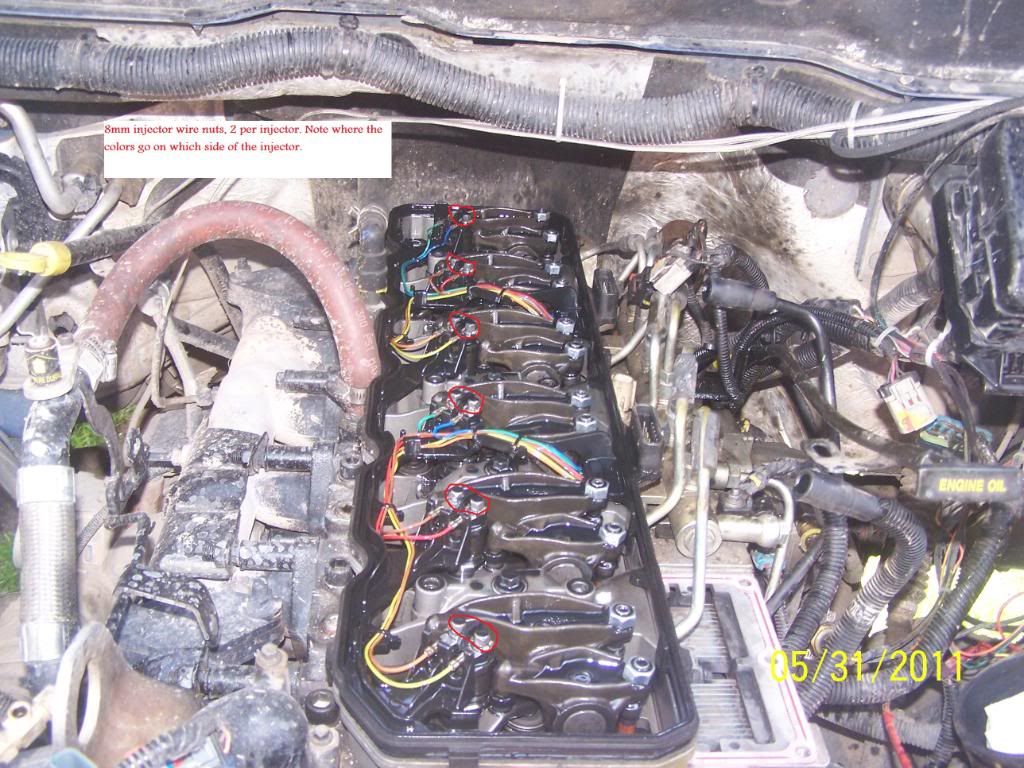
11.Loosen the 2 8mm nuts on each injector, be careful not to break them. They stay connected to the wire. Note the color of the wire to where it goes on the injector. Once all loosened up, pull the valve cover gasket off .
![Image]()
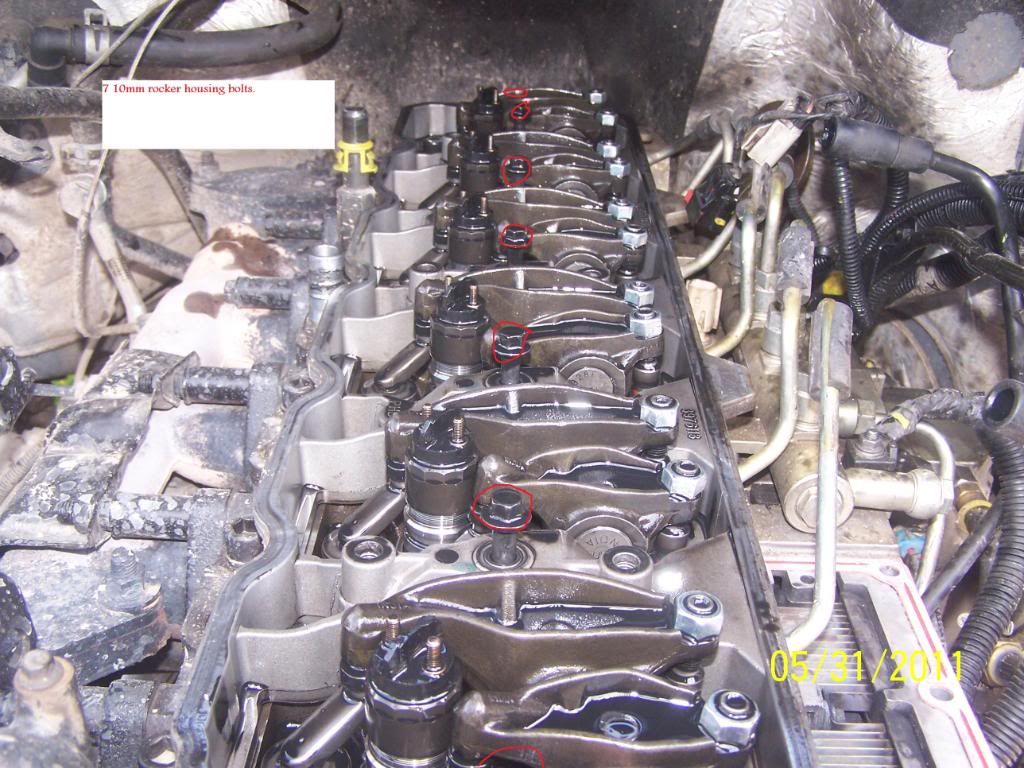
12. Remove the 7 10mm bolts on the rocker housing, and remove housing.
![Image]()
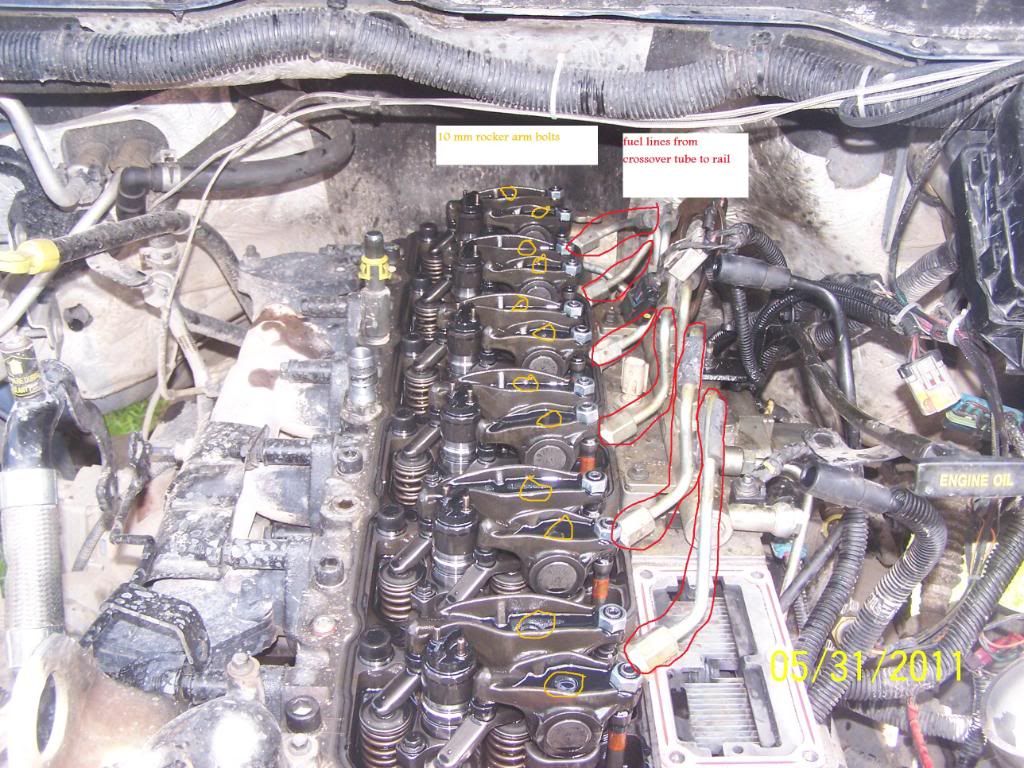
13.Remove all 6 fuel lines going from cross over tubes to fuel rail. Start with #1 and work your way back using 3/4" wrench.
![Image]()
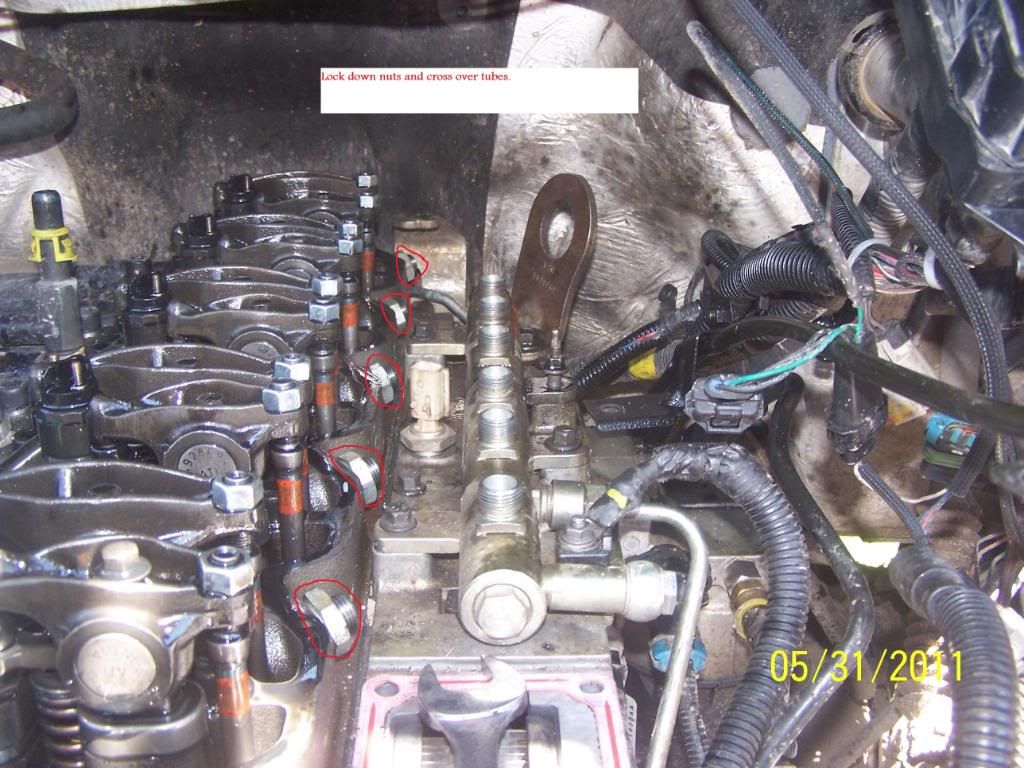
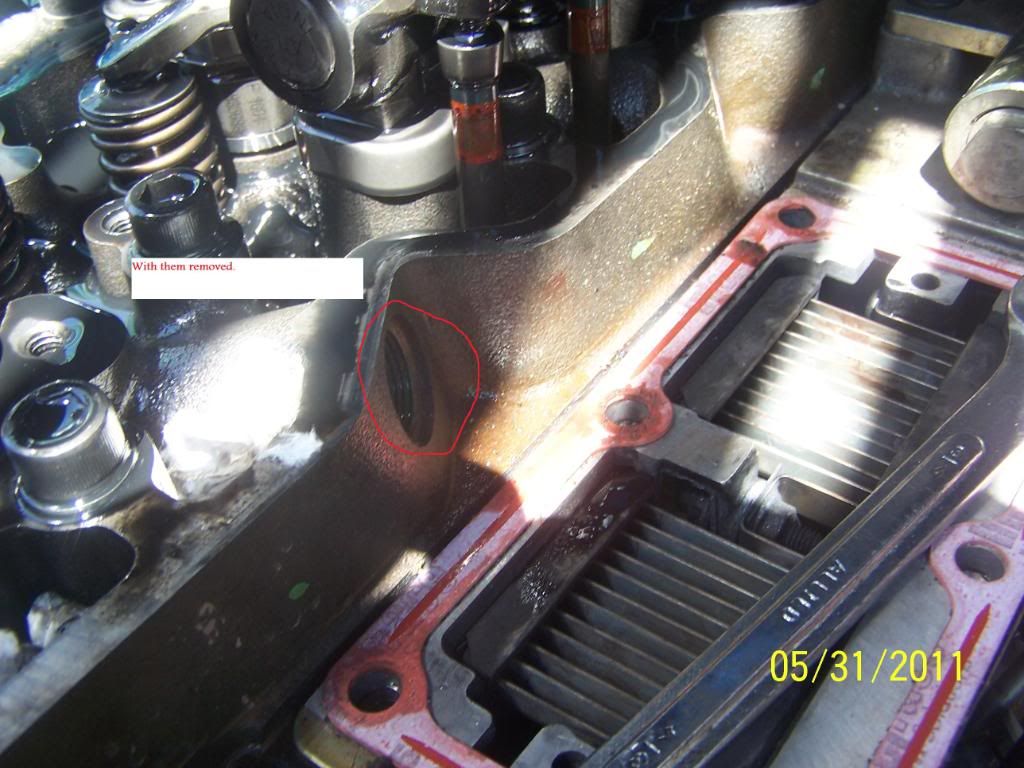
14. Remove lock down nut 15/16" wrench, and cross over tube out of head. Start with #1 and work your way back. If you cant wiggle and pull them out by hand, take a fuel line and screw it back on and use it to pull it out.
![Image]()
![Image]()
15. Loosen 10mm rocker arm bolts on all rocker arms, 2 per cylinder.
![Image]()
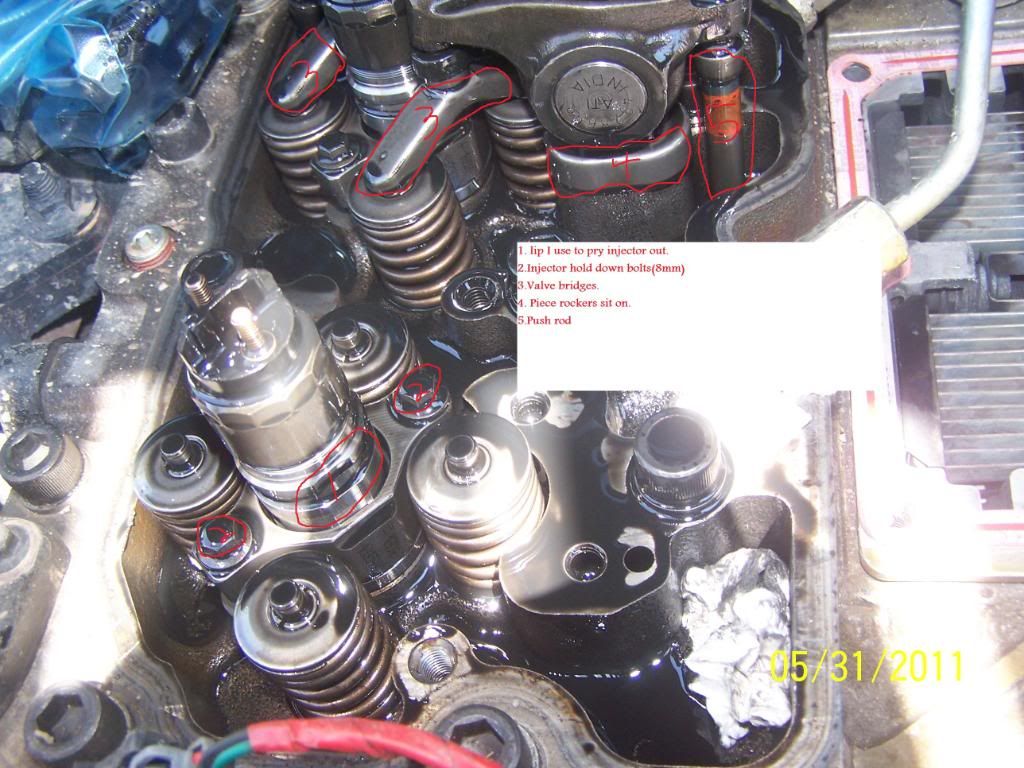
16. I use zip lock bags or you can lay them out on a table. But starting with #1, pull the exhaust and intake rockers off and put them in the bag labeled #1, pull the piece the rockers sit on, and put it in the same bag. Pull the valve bridges off and put them in the same bag. Pull the push tubes out and put them in the same bag. Put paper towels in the push tube holes so nothing can be dropped down them. Loosen up the 2 8mm bolts on the injector hold down. I use a big screw driver to pry against the lip on the injector and they pop right out. Put the injector in the same bag, and put a papertowel in the injector hole, and then follow the same steps for the rest of the cylinders. For #5, and 6 there are 2 rubber gromments above them, that need to be removed, so when you pull the push rods out, you lift them up into the cab, and they will have room to come out.
![Image]()
17.Remove fuel line from rail to cp3 3/4" wrench
![Image]()
18.Remove banjo bolt from rail to fuel filter housing, and remove banjo bolt on the back of the head to fuel filter housing using a 17mm wrench. There are two rubber/metal washer gaskets on the banjo bolts, dont loose them.
![Image]()
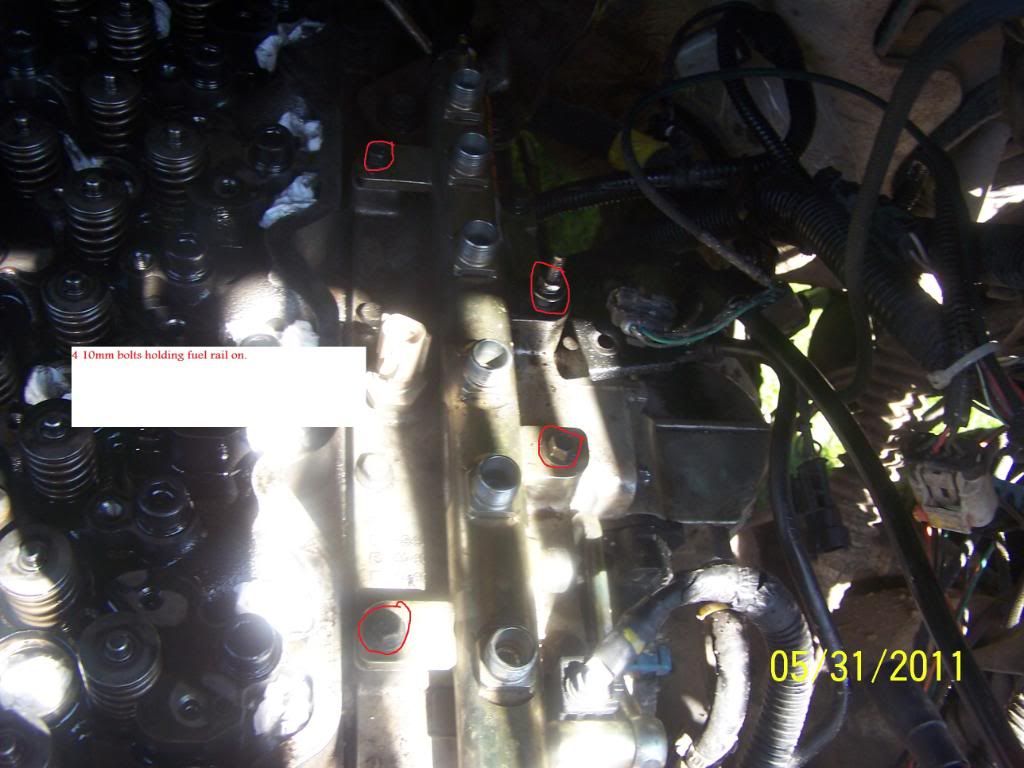
19.Remove the 4 10mm bolts holding the fuel rail on, and remove fuel rail.
![Image]()
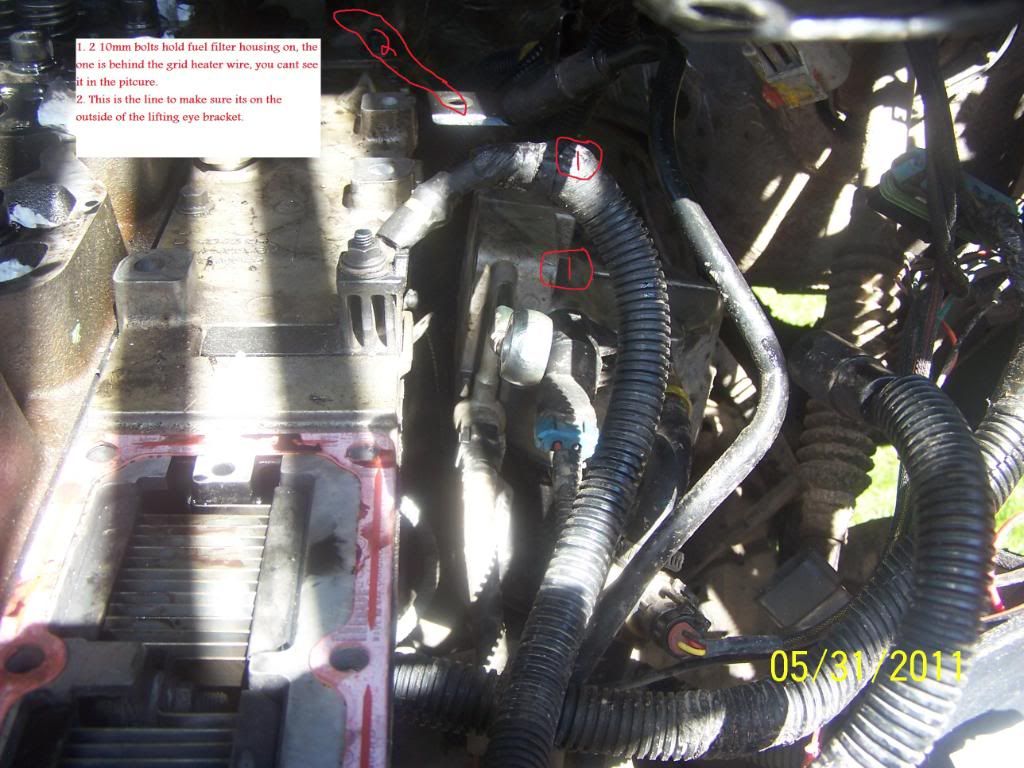
20. Remove 2 10mm bolts holding fuel filter housing to head. Pull it out so the line going to the back of the head is on the outside of the lifting eye bracket.
![Image]()
1.Disconnect both batteries. Its a 1/2" nut, I just use a ratcheting end wrench, and I take off both neg and pos terminals.

2. Unhook all sensors. Pictures show all sensors but Map sensor which is on the back side of the inake horn. If running stock intake horn there will be a couple more sensors on the horn that need unhooked.
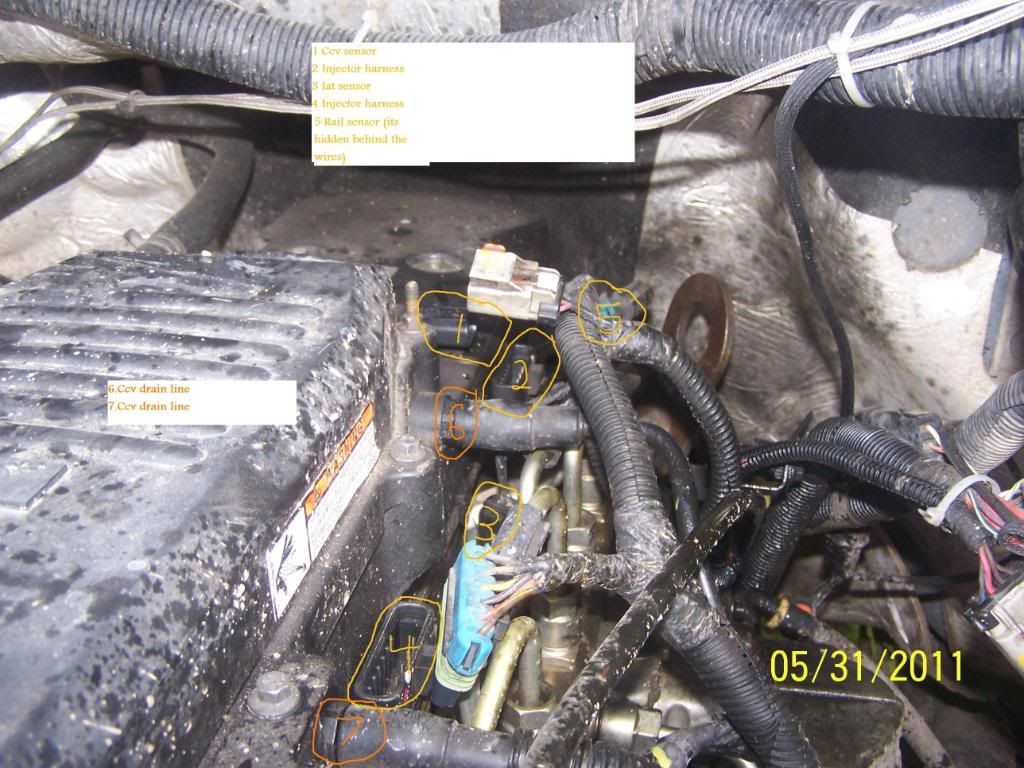
3. Unhook both ccv drain lines. Just wiggle them back and forth and pull them off. Might have to use a flat head screwdriver to pry them away also. Once the lines are removed, pull out the fittings using a 3/4"
4.Remove cold air intake, or stock airbox from truck. I have a afe, and dont run the box on it, so I just used a flat head screwdriver and loosened up the clamp right on the turbo, and pulled the whole tube and filter our as one piece. I also have my ccv line bypassed and plugged , so if you have a stock airbox you will need to unhook that line also.
5.Drain coolant out from the bottom of the radiator, use a pair of pliers if it wont turn by hand. It turns 90* then pops out. Put a clean bucket underneath it so you can reuse the antifreeze. It drains pretty slow, and you dont need to drain all of it out just like 2 gallons, you can leave it draining and move onto the next steps, then close it up later.
6.Remove dipstick bracket. I am running h&s horn, so I use 7/16" wrench and unbolt it from the bracket that is hooked to the ccv cover. If running stock intake it will be 1 10mm bolt holding it on.
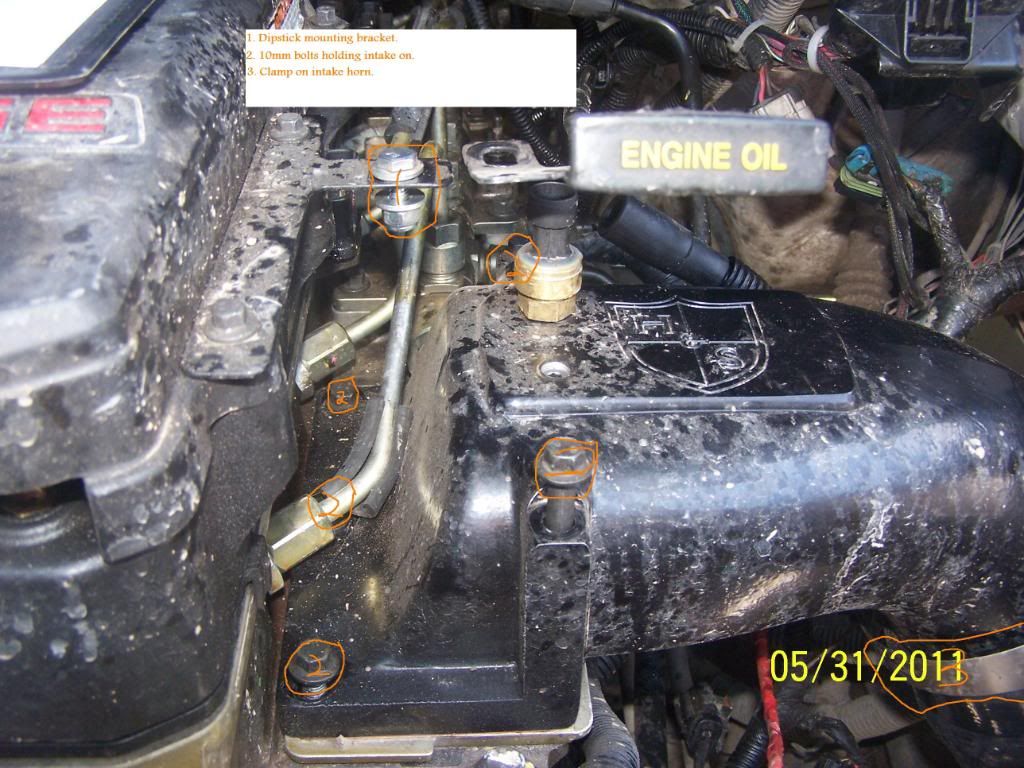
7. Remove 5 intake manifold bolts, or 6 if running stock intake. They are 10mm and I use socket and rachet with extension. Loosen clamp up on intake horn to intercooler piping. I used a 7/16" ratcheting end wrench, or you can use a deepwell socket. Remove the intake horn, being careful to not ruin the gasket unless you have a new one. I also put papertowels in the tubing so nothing can be dropped into it.
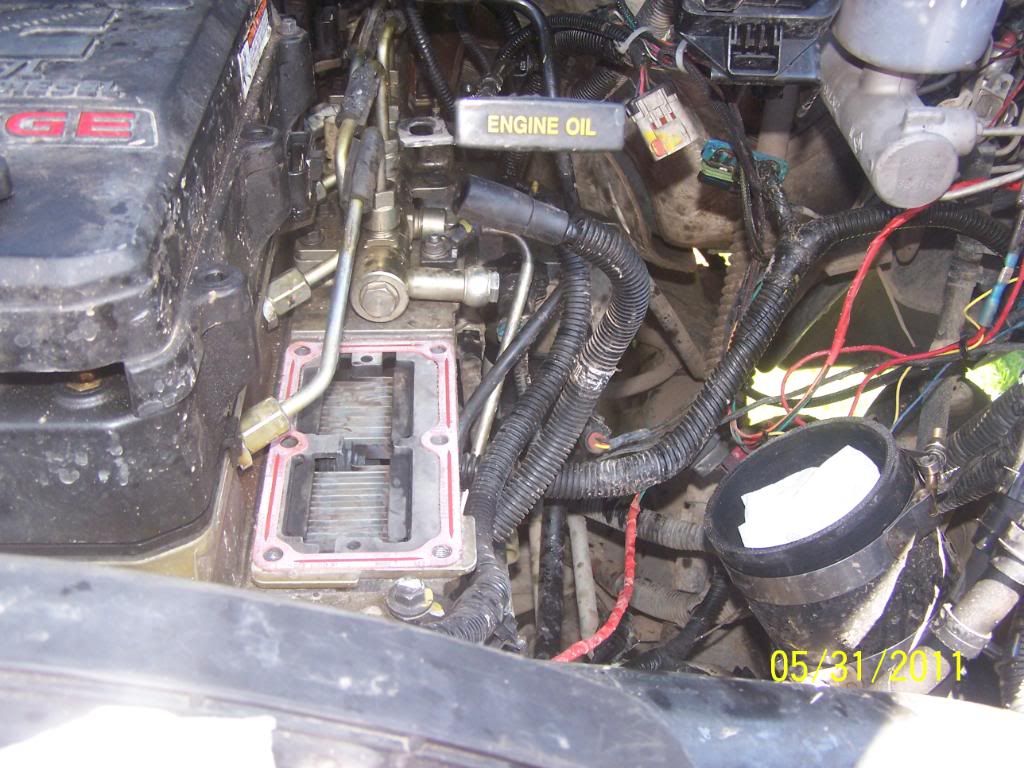
8.Remove the 8 8mm bolts holding the ccv cover on. Remove oil cap. Pull off cover and remove ccv filter. Inspect filter to see if it needs replaced.
9. Loosen the 6 10mm vlave cover bolts, and pull valve cover off.
10.Remove the coolant lines off the head fittings, if you are plugged then you dont have to remove the one. You can screw them out of the head now, or leave then in tell the head is pulled.
11.Loosen the 2 8mm nuts on each injector, be careful not to break them. They stay connected to the wire. Note the color of the wire to where it goes on the injector. Once all loosened up, pull the valve cover gasket off .
12. Remove the 7 10mm bolts on the rocker housing, and remove housing.
13.Remove all 6 fuel lines going from cross over tubes to fuel rail. Start with #1 and work your way back using 3/4" wrench.
14. Remove lock down nut 15/16" wrench, and cross over tube out of head. Start with #1 and work your way back. If you cant wiggle and pull them out by hand, take a fuel line and screw it back on and use it to pull it out.
15. Loosen 10mm rocker arm bolts on all rocker arms, 2 per cylinder.
16. I use zip lock bags or you can lay them out on a table. But starting with #1, pull the exhaust and intake rockers off and put them in the bag labeled #1, pull the piece the rockers sit on, and put it in the same bag. Pull the valve bridges off and put them in the same bag. Pull the push tubes out and put them in the same bag. Put paper towels in the push tube holes so nothing can be dropped down them. Loosen up the 2 8mm bolts on the injector hold down. I use a big screw driver to pry against the lip on the injector and they pop right out. Put the injector in the same bag, and put a papertowel in the injector hole, and then follow the same steps for the rest of the cylinders. For #5, and 6 there are 2 rubber gromments above them, that need to be removed, so when you pull the push rods out, you lift them up into the cab, and they will have room to come out.
17.Remove fuel line from rail to cp3 3/4" wrench
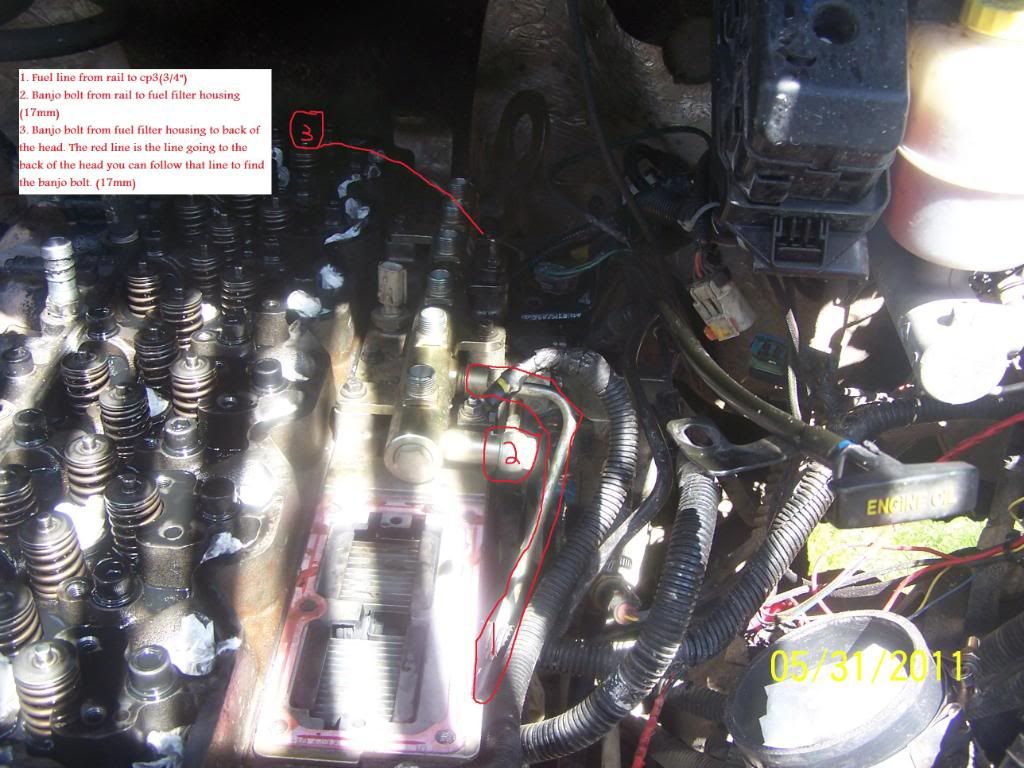
18.Remove banjo bolt from rail to fuel filter housing, and remove banjo bolt on the back of the head to fuel filter housing using a 17mm wrench. There are two rubber/metal washer gaskets on the banjo bolts, dont loose them.
19.Remove the 4 10mm bolts holding the fuel rail on, and remove fuel rail.
20. Remove 2 10mm bolts holding fuel filter housing to head. Pull it out so the line going to the back of the head is on the outside of the lifting eye bracket.


 , if under the hood is that dirty, you should have seen the rest of the truck


