Cummins Diesel Forum banner

HTT S300G Compressor Upgrade

91K views 735 replies 33 participants last post by  CTD2500  
#1 · (Edited)
High Tech Turbo- S300G Stage 2 Upgrade*- 1994-2002 Dodge Cummins 5.9 12/24V

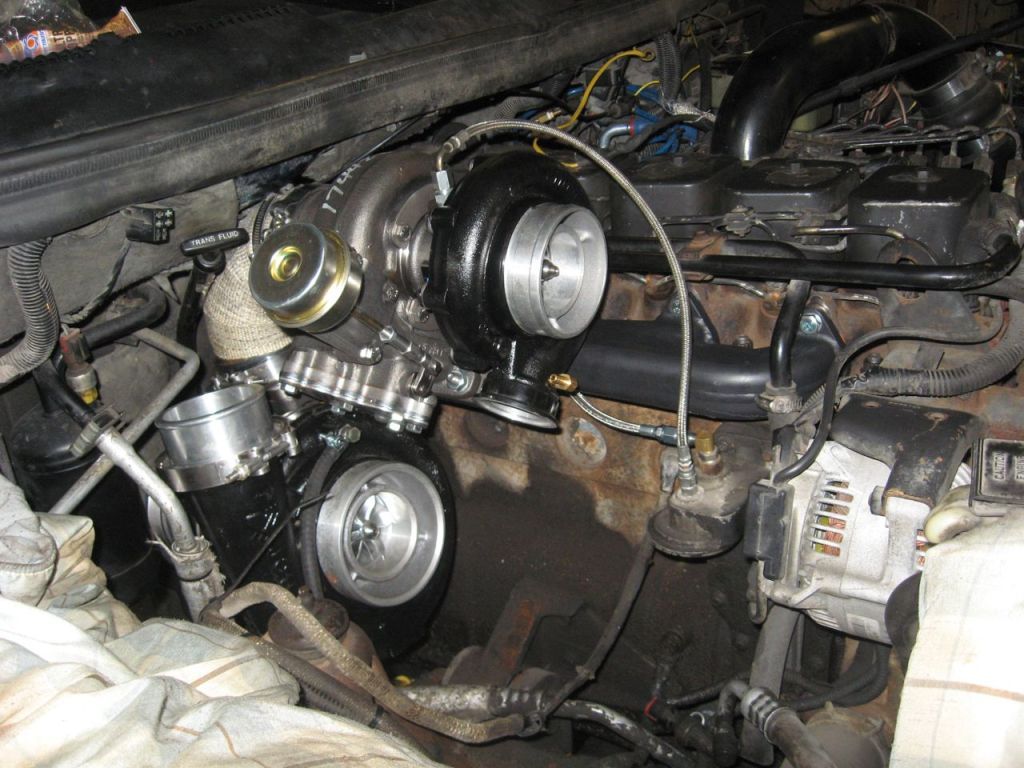
Anyone tried this? I called HTT yesterday about it, they told me it's a 60mm inducer, but the guy wasn't sure if it was extended tip or any of that. Says it won't add lag to a point that one could notice it...bolts on, no issues reported with balance that they've heard of. The link I gave is the cheapest I've seen it, which is far cheaper than HTT's website. I have a standard 174430 S300G brand new, going into a twin set with a Batmo K31 (71/86/1.28 gated) and was thinking of adding the bigger compressor to the G.
Originally, I was going to use my A3K and switch the 14cm gated S300 housing onto it, but ATS cuts the exhaust end of the CHRA housing about 1/4" smaller to fit into the .85 A/R non-gated housing. Too bad cuz the A3K compressor cover looks like it flows much better than the S300G cover. I thought about changing the A3K compressor wheel and cover over to the S300, but I thought it may be a better option to sell the A3K, buy the 60mm upgrade and have some cash left over.
Or I may just run it as is, unless someone can tell me the HTT upgrade is totally awesome. PS. searching keeps giving me matches to 60mm compressor upgrades for the Holset turbos.

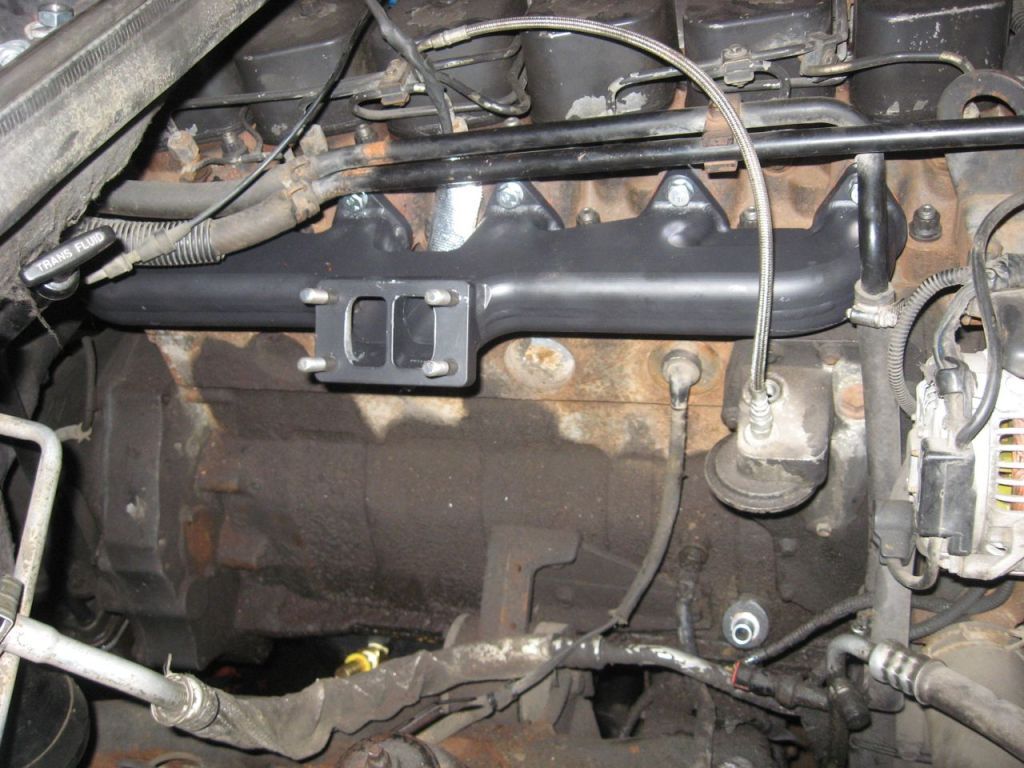
PPS. if anyone has or is getting a twin set up from PDR, a Steed Speed manifold does NOT work with it! It sticks out too far and won't allow the hotpipe to swivel as close to the block as the ATS manifold does. This puts the downpipe outlet straight into the firewall. I had to remove everything again to re-use the ATS manifold and am in the process of getting more manifold gaskets, since I torqued down the ones I had with the Steed Speed. The truck is an hour drive from here at my Uncle's farm, I live in an apartment, which is no good for big installs. I'll try to do the thread on the twins once they're in for good.
OK, I'm rambling, HTT upgrade - good or bad?

Image

Image

Image
 
  • Like
Reactions: Clunk and CTK30
#2 ·
Got them installed this weekend, used the old ATS manifold and she fit much better. Sure is a lot of work to do by yourself! Actually, my brother came and helped me mount the primary, but that was it.

I also wanted to say in regards to the first post, I was in no way making any negative points about the Steed Speed manifold...it just doesn't work with this twin kit. It is a magnificent piece of work, the quality and design are awesome and it's a total bummer that I couldn't use it. Leen Steed was great to deal with as well. The same goes for the A3K. I tried to find a reasonably easy way to make it fit, but it just wasn't happening. Too bad, it's a great little turbo. The S300G is the same thing though, so it's no big deal.

By the way I'm aware that I'm way off topic from the original post. I didn't think it was worth starting a new thread for the compounds since I didn't have time to take very many photos.
So, no one has any input or experience on the 60mm HTT compressor upgrade for the S300G?

Image

Image

Image
 
#3 ·
I'm going to talk to myself more now...:hehe:
No one's had any input on the S300G compressor upgrade so I figured the best way to find out was to buy it. $270 plus $160 refundable core...no a terrible price...well it turns out the guys who answer the phone at HTT don't always know what they're talking about...he told me 60mm, but this wheel is actually a 62mm wheel that comes with the little S300G compressor housing that is cut to accept the bigger wheel. It's not what I thought it was, but it kind of is a bonus I suppose. Hopefully it doesn't create too much more lag. I'll post a photo or two when I get a chance for those of you silent onlookers who are interested.
 
  • Like
Reactions: customharvester2011
#526 ·
LOL, nice work you have done so far, i am actually looking for a 64mm/88mm upgrade compressor cover, and it is impossible to find, upgrade parts for BW/schwitzer are rare compared to the holsets, thats for sure.... currently looking for someone to machine the original cover, that does not want the whole turbo, so they can take out my perfectly good rebuild kit to charge me for a rebuild...:rof... anyways, nice work, i have been following your progress for some time, being a fellow canuck....:thumbsup:
 
  • Like
Reactions: CTD2500
#5 ·
Thanks for the info...that puts that to rest. This 62 will be better anyway. This info is good, I tried to search for what I was trying to do with the A3K/SuperB...threw some PMs back and forth, but you never know until you try it yourself. Hopefully this thread will be helpful to others. I thought it was also important to mention the Steed manifold throwing things off...I really didn't like installing that K31 twice and I'm sure others would feel the same.

Anyway, I got a few snaps of the HTT setup. It's going to need some black paint on the cover to match the others.
Image

Image

Image
 
#6 ·
I guess I may as well put some twins pics as well...they're from PDR. Not a bad kit...they do have a bit of a unique look to them. And of course the Batmowheel and attempted Steed Speed was added by me. I also had the 14cm S300 housing machined for faster spool and the wastegate holes were ported from 12mm to 18mm. This was done by Gillett Diesel. I also added a BD turnbuckle to the S300 to make wastegate adjustment possible.
I chose the K31 kit because having both turbos gated is nice for boost/DP control plus the K31 is the only large turbo that you can buy a Batmowheel for without having to buy a whole turbo. I've been interested in trying one of those wheels since they came out.
Gonna need some bigger injectors next!

Batmo K31
Image

S300G
Image

Image

K31 is supposed to be crooked they said...for wastegate clearance
Image

K31 is really crooked here because the boot on the S300 was too short. Got a longer one as seen in the older post.
Image

Threaded bung welded on and sealed with some JB weld...then punched
Image

New drain fittings
Image

In the shop at the family farm
Image

The rest are already posted above...there are more pics, but are mostly more of the same things.
 
#8 ·
Nice! Sorry I forgot to mention the guy who ported the holes put a 1/2" spacer under the w/g cover...(it's actually 2 thinner spacers, I had a spare laying around, you can see them in the 3rd pic in my last post) so I knew I had as much flow as I could get by using bigger holes and more opening. The stock opening is terrible...like 1/8". I guess now it opens about 5/8" roughly and doing some math (pi/r squared) revealed that one 18mm hole has more area than both 12mm holes combined.
Ren, your dome setup is cool because having the whole cover raised up with the spacer caused clearance issues with the K31 compressor...until everything was clocked right and I moved the wastegate hose. I've seen some of your work in other threads Ren, it is quite excellent.
I was going to port mine myself, but you have to cut off and re-weld the wastegate arm because the pucks are in the way so I couldn't get the die grinder in there...I was going to send it out to get the quickspool mod anyway (which is $40) so I asked Steve at Gillett about the porting and he said he'd do the quickspool AND porting for $125...so I took that option.
 
#9 ·
Installed the 62mm wheel today. Couldn't start it after because I drained the oil to fix an oil leak where the second turbo drain goes into the pan...the oil found a little pinhole in the JB weld to sneak out of...so the obvious and hilarious solution was more JB weld. But I had to drain the oil so it would stop coming out.
I probably won't be able to see any difference with the new compressor anyway since I've only driven it 2 or 3 times since the compound install...because of the leak.
Sorry, no photos of the 62mm installed...I didn't bring the camera with me and like I said before I live in an apartment building, so to go back up the the apartment I have to pick up all the tools and parts and put everything away and lock up the truck which is a HUGE pain...I hate when I forget to bring something down when I work :banghead:
 
#11 ·
It's going to have to do for now...:confused013:
The bung is welded underneath, but in my infinite wisdom I tacked it too close to the top rail of the pan and couldn't fit the tip of the MIG around the top. It's on there solid, you can bash it with a hammer and it won't budge. There's a good bead of weld about 2/3rds of the way around the bottom...it just would've leaked like a bugger so that's where JB comes in. Not the result I imagined, but it was my first attempt at it. I think the reason the JB weld leaked was when I punched the hole in the pan through the bung, the vibration cracked the JB weld. (I had attached the bung a few weeks prior to the install)
I appreciate your comment Ren. :thumbsup: The plan down the road, because the pan is pretty rusty in some spots, (cuz thats what Canadian winters do to a vehicle :doh:) I had planned on the possibility of having to replace the pan. So, when I do that I was going to weld a nice professional looking drain on there when its easy to do on the bench. I may actually get my brother to do it, he can work a TIG welder like nobody's business.
 
#13 ·
I hear ya, it would take some big balls to do it that way for sure :hehe:

Thanks
 
#14 ·
I have that same pdr twins setup. I kept blowing the 90 silicone boot that connects the secondary to the intercooler piping. Right now I am making a 90 out of tubing with straight couplers. So just watch for that because that is the only downfall of their kit. Do you have any idea what HTT's 2.5 upgrade is for the 300g? I have a 62/71 sittin on the bench that I could throw on, but If I could uprade 300g I'd rather do that. Was it hard to install the new wheel? does it need balanced or anything?
 
#15 ·
Wasn't too bad to install...the secondary is pretty easy to remove if you leave the turbine housing on and just remove the CHRA housing from the turbine. The whole job took me about an hour with hand tools. The HTT upgrade is just a 62mm compressor wheel and the compressor cover machined to fit it...the exducer of the wheel is the same as the 58mm wheel so it just bolted on. I torqued it on at 175 in-lbs with some blue loc-tite. I asked them about balance, they said its better to check it, but lots of guys have just put them on without problems. I haven't ran mine yet since I put it on...I haven't had time to put the oil back in yet. I'm sure I'll know pretty quick if the balance is that far off. It seems like a good upgrade...same turbo as a 62/65/14 except it has the 0.5 A/R compressor housing. (but I'm not sure if the real S362 compressor wheel has an 83mm exducer or if it's bigger though) HTT claims it can do 500hp as a single.
:hehe: After typing all that I just realized you were asking about the Stage 2.5 kit...I'm not erasing it though, it was a lot of work to type and it may come in handy for someone. Anyway, the 2.5 is just that they add an adjustable wastegate actuator along with the wheel/cover. Stage 2 is just the wheel and cover, which I got cuz I already had the BD turnbuckle.

Thanks for the heads up on the 90 deg boot, I wasn't much of a fan on how it looked on mine either...that stock cast aluminium elbow needs to be longer so there's more room to clamp onto.
 
#16 ·
Ya right after I posted that I realized that the 2.5 just came with a wastegate actuator. Im really thinkin about doing that upgrade now. But ya the silicone 90s just cant handle that much pressure. Here are my last two.
Image

Image
 
#17 · (Edited)
Oh I see, I thought you meant they were just blowing off the pipe, but they're actually blowing apart...that sucks. Did PDR send you the new ones or did you buy them from someplace different? I wonder if someone else makes stronger ones :confused013:
What boost were you running when they blew?

Hey, with your kit, did you find that the K31 wastegate actuator is extremely close to the frame?
 
#18 ·
Well I bought the kit used, but it had never been installed so it ws basically brand new. When I got it that 90 was missing, so I bought a cheap one from silicone intakes. It lasted for a while but it blew up. I figured it was just because it was cheap. So I went ahead and ordered the 75 dollar one that pdr actually runs in their kit thinking it was probably better quality, it didnt even last as long as the first one, although I could tell it was still stronger. So today I did this, hopefully it holds up. I think it should.
Image
 
#20 ·
Yeah that might work, I'm sure it puts a lot of pressure on that boot when the pressure/flow hits that sharp bend. Hopefully mine won't give me too much grief since I have wastegates on both turbos...I'm hoping to run 50-60 psi since I just have studs and no o-rings. Ideally I wanted to run the lowest boost that will run smoke free...but that'll depend on what injector I go with.

What boost psi did yours blow at?
Let me know if your mod works out.:thumbsup:
 
#21 ·
OK, I finally got the oil leak stopped Monday night and I drove the truck to work today. As I said, I only drove with the 58mm turbo a few times and I was driving it pretty easy. That said, I noticed right away a difference with the 62mm compressor...no more power or EGT reduction cuz I'm still being very easy on it, but I can now hear the lovely turbo whistle with the bigger wheel. It's faint, but it's there. I couldn't hear the 58mm. Not at all. I understand that the sound of it has to get out through the K31 compressor before you can hear it, so I was OK with it, even though I love the sound, but now I can hear it again.
Also, spoolup is not slower...not that I can tell. In fact, on a few instances I thought it spooled better. Like on the main road on the way home from work there's a few inclines which I've always played with, like giving a bit of throttle while going up them and watching the boost gauge move, (I did this with my A3K constantly) but today I was surprised to see 2-3 PSI while holding fairly steady on the throttle going uphill. Cool!
In terms of power/EGT, I'm sure it'll be better. I don't think you can increase the inducer size by 4mm and expect to see no difference. Granted, there's much more to a turbo than compressor inducer size, but that's a significant increase.
The only thing that was kind of a bugger is that they told me it was a 60mm wheel and it's fine that it's bigger, but if I knew it was a 62mm then I would have just bought an S362 in the first place! :doh: Oh well, it beats buying a whole new turbo if you had an S300G and wanted a 62.

Good upgrade from HTT, IMO. :thumbsup: So far.
 
#23 ·
Question about sliding fuel plate FF

I'm getting more comfortable with these compounds now, had them up to 53 PSI. Surprisingly they spool pretty well with the fuel I have. They definitely need some tuning, I think the secondary opens its gate way too soon. Boost jumps to about 18psi pretty fast, then it takes forever to get to 30 then it takes off again from there. I shortened the wastegate rod about 1.5 turns on the secondary, but I haven't been on the open road to try it yet. In town going to work everyday it seems like the traffic is going super slow just to drive me crazy...:banghead:
Oh, and that Batmowheel sure has it's own unique sound...it kind of has a 'space age' or 'electronic' sound to it, but right around 45 psi it got pretty damn loud. I thought it was going to bust out my truck's windows like an opera singer, lol.

Anyway, to my question. Today I was tying up some loose ends under the hood and I decided I'd slide my fuel plate full forward, which I did...but I noticed that with the plate fully towards the front of the truck, the AFC housing would not slide at all when I re-installed it loosely, it would only sit in the one place. I'm not sure if it was full forward or not, which is where I normally have it. Anyone else ever run into this?
I know someone will say just take the plate out...but, one step at a time. I'll likely have the AFC off again cuz I'm tinkering with some different spring combinations. I'm trying to cut the smoke down, but keep good spool up. Right now I have the light spring from the AFC spring kit and one of my original inner governor springs inside the AFC spring. The shorter inner gov spring sits perfectly on the end of the star wheel barrel. I did have to grind about 1/8" off the end of the star wheel barrel so the little spring wouldn't bottom out, limiting full travel. (I have the flat washer and the AFC arm barrel ground off a bit, as per the usual AFC tuning method) We'll see how it works.
 
  • Like
Reactions: Headcase98002
#24 · (Edited)
I may have answered my own question...now I'm thinking the top of the plate hits the inside of the AFC housing...causing it to only sit full forward when the plate is full forward. Does this make sense?


Oh and I meant to ask Chad256 how the new pipe is holding up?
 
#25 ·
Update

Well, I finally got around to taking chad256's advice about the 90 deg boot popping...mine popped off actually, back in Sept I think. The truck has been in storage since late Oct so I'm doing some maintenance on it while it sits. I took off the charge pipe and took it home (it's at a friend's farm 2 hours away)...I bought a tight radius 90 degree pipe on ebay and a hump hose from siliconeintakes.com to remove the questionable silicone elbow. My brother is a machinist and a whiz on the TIG so I took it to him and explained what needs to be done, where to cut and how long, etc. and so we worked at it and basically made this:
Image

into this:
Image


It was pretty straight forward, really. Had to cut off the barb on the end that's in the silicone elbow in the first pic, the cut and weld on the new 90 deg pipe, (you can see the unpolished section in the second pic) then weld the barb onto the elbow where the new hump hose is. Obviously the new pipe still isn't as tight of a bend as the boot was, so we had to shorten the section along the bottom that goes to the intercooler to keep the overall length at 17"...you can see the extra weld there. It should still clear the battery and lower rad hose AND...no more silicone elbow. Now since the truck is 2 hours away, I won't know if it fits for a while until next time I go. Hopefully I measured right! I know it looks taller now, but that's just an optical illusion because the vertical section is moved 1.25" close to the intercooler. (left in the pic)
 
#26 ·
dang keep up the good work!!! makin me jealous!! cant wait to mount my 66mm chager and 3-piece mani and throw some timing and my DV's and 4k gsk at it! ;) ha enough of my rambling....good work! :thumbsup:
 
  • Like
Reactions: CTD2500
#27 ·
Well, I finally got a chance to go see my truck again...sitting in winter storage. It was a relief to finally see if the I/C pipe would fit...and it fit perfectly!
While I was there, we put it up on the hoist and replaced the front shocks and did Crazy Carl's TV cable mod.
Like this:

http://www.cumminsforum.com/forum/9...ce-parts-discussion/534021-stronger-pull-trans-cable-without-limited-throw.html

Since the truck is not insured, I couldn't try it on the road, so I'll have to wait until spring to see how it goes. I managed to get some phone pics of the pipe in place, oh and I installed the Amsoil air filter that I got to replace the AFE filter that came with the twin kit. The Amsoil was a bit wider and a different shape, so I had to shorten the intake pipe by almost 2".

Image

Image

Image
 
  • Like
Reactions: Headcase98002
#28 ·
Nice work! What does your primary mount look like? Yeah I also thought that the s300G comp cover is really small and am wondering myself if there are other covers for them. It even just looks like a person could really port the crud out of it to open it up some more. I was considering trying a super HX40 wheel in my Super B, but it will have to wait till later.